Marking Your Lie
Appropriately marking your lie and creating a legal stance behind your marker is often problem on the disc golf course because of the different circumstances we face. Whether you’re just learning the game or you’re a seasoned Pro; it is important to understand these rules for the fairness of the game and give yourself an advantage when it comes to marking your disc correctly.
According to the PDGA Rulebook, a thrown disc should be marked by “placing a mini marker disc on the playing surface between the hole and the disc, directly in line with the hole, on the line of play, touching the thrown disc.” The player may also decide to use the thrown disc as the marker, this disc must not be repositioned or moved until the throw is complete.
Now there are about a billion mini marker discs out there for sale, but you can also create your own marker as long as it meets these requirements according to rule 802.02 in the rulebook, “mini marker discs must have a diameter of between 7 and 15 centimeters and a height not exceeding 3 centimeters.”
Once a disc is marked with a mini, the disc can not be placed down again; the mini must be used as your marker once the disc is removed. To avoid this situation, place the mini marker in front of your disc and then decide which footing would work better for your stance. The PDGA states that, “you can’t move anything unless it’s [unattached and] in your stance. If something is both in your stance and between your lie and the hole, you can move it. You can always ask people to move themselves or their stuff if they are in your way.”
Taking Relief:
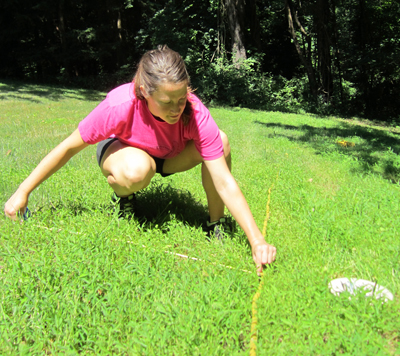
To mark your disc after you have thrown O.B. requires some assistance from your group. Your group must decide on a place where the disc was last seen in bounds, NOT where the disc landed. Once you have all agreed on a spot, you have the option to take relief from that OB line, or throw from your last approximate lie. The PDGA states, “the lie may be relocated to any point on a one-meter line that extends perpendicularly from the nearest point on the out-of-bounds line, and passes through the center of the thrown disc.”
For me, I literally took a tape measure to see how long 1 meter (3’3″) is in reference to how many footsteps I can take. I can then quickly walk out 3 1/2 steps and I am roughly at 1 meter. For more difficult markings, I have a piece of 1 meter long string in my bag that I pull out and quickly mark to give myself the correct amount of room.
Casual Relief, Optional Relief, and Optional Rethrow- What’s the difference?
Casual Relief relates to ‘Casual Obstacles’ found on the course such as, “casual water (not OB), loose leaves or debris, broken branches no longer connected to a tree, motor vehicles, harmful insects or animals, players’ equipment, people, or any item or area specifically designated by the director before the round. The player must first attempt to remove the obstacle. If it is impractical to move the obstacle, the player’s lie may be relocated to the nearest lie which is no closer to the hole, is on the line of play, and is not more than five meters from the original lie, as agreed to by a majority of the group or an official (unless greater casual relief is announced by the director).” – PDGA Rule 803.05
“Optional Relief: A player may declare that he or she is taking optional relief. The lie may then be relocated to a new lie that is no closer to the hole, and on the line of play. The original throw plus one penalty throw are counted in the player’s score.” This would come into play if you find your disc in a large pricker bush and you can’t create a legal stance. – PDGA Rule 803.05
“Optional Rethrow means players may rethrow from their original lie if their disc lands in any of the disc golf penalty hazards – OB, Missed Mando, above 2m and Lost (which already is handled this way) – and receive a 1-throw penalty. Of course just like the old Unplayable Lie rule, a player may choose this Optional Rethrow penalty without permission from the group no matter where their disc lands whether inbounds or a hazard location.” – PDGA Rule 803.06
Any disc that lands within 1 meter of the Out of Bounds line but is still IN BOUNDS has the option to take relief from the O.B. line as to not stand in the area marked as O.B..
The Infamous “Rule of Verticality”, while contrary to many beliefs, reads as this, “The out-of-bounds line represents a vertical plane. Where a player’s lie is marked from a particular point within one meter of the out-of-bounds line pursuant to the rules, the one-meter relief may be taken from the particular point upward or downward along the vertical plane.” This would relate to a situation where you need to mark your lie from a steep river bed. You would imagine the O.B. line as if it were vertical to where you could take your meter relief from that line rather than measuring the steep cliff.
Marking a Disc Above or Below the Ground can be tricky.
If the “2 meter rule” is in affect, it is important to know roughly how tall 2 meters is. While you can bust out a tape measure and measure out 6’6″ – this takes too much time. Instead, I premeasured to see how tall it reaches if I raise my hand. Then I know a general point of reference to quickly decide if the disc is in question to not stall out play. If its a close call, the benefit of the doubt ALWAYS goes to the player.
A mini marker must be used at this point to give you a place to develop a legal stance. Place your mini marker directly under/above the front edge of the disc in the direction of the basket. If the area 30cm behind the disc, lets say the trunk of the tree or a hole in the ground. You should take your stance in the first available spot behind the lie even if it exceeds 30cm.
For the PDGA Rules Description on “Marking the Lie” visit http://www.pdga.com/rules/80303-marking-the-lie
Article on Creating a Legal Stance, Coming soon!
