Yoga for Disc Golf: Back in Action
I need to start out by saying these poses are NOT recommended for anyone with a back injury, as these moves may make them worse. If you have mild back pain, these moves may help to relieve the tightness. No matter what you do, listen to your body and never push yourself past what you can handle.
Our backs contain large muscle groups that we use everyday from active movements to just sitting up. We may find ourselves slouching through the day on a computer, or maybe causing a stiff back from driving in the car, or maybe you just played a couple rounds of Disc Golf. Whatever it may be these moves can be so beneficial to your body to keep your back and spine healthy! Enjoy!
Cat/Cow: Start in “table top” on your hands (shoulder distance apart) and knees (hips distance apart) with your back flat. As you inhale, move slowly into Cow pose by dropping your chest to the ground, lifting your sit bones and opening your chest and lifting your chin; If your eyes are open you can look up to the ceiling. As you exhale, move slowly into Cat pose by rounding your back and bringing your chin to chest. Continue to breath and move in this sequence. Feel free to stay in a pose a little longer if it feels good, maybe wiggle back and forth, just to get your spine moving.
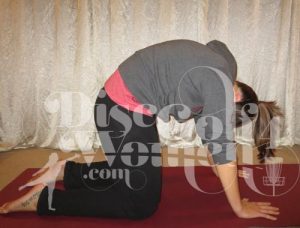
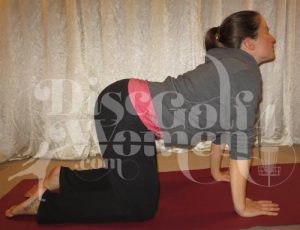
Figure 8: From table top on your hands and knees, circle your hips clockwise in a figure 8 motion. Feel free to stop and stay in a spot that feels good to get some extra stretch. Circle your hips about 4 times, then switch to counter-clockwise doing the same motion.
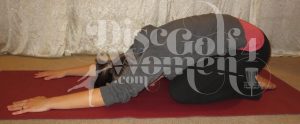
Child’s Pose: This is a great way to relax your back while giving yourself a slight lower back stretch. From your hands and knees, bend your knees to sit your hips to your ankles and lower your upper body to rest your forehead to the ground, arms extended in front of you or at your sides with palms up. You can keep your knees together, or spread them apart which allows your upper body to lower to the ground. If this too intense on your knees, place a pillow or 2 under your seat. Use your hands to push your hips farther back onto your feet to increase the stretch.
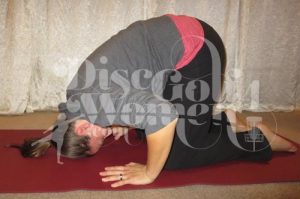
Bonus move: From Child’s pose, bring your hands under your shoulders and round your upper back to come to the top of your head. With most of the weight on your hands, allow yourself to roll forward and backward on top of your head as many times as you would like.
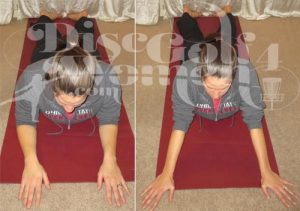
Sphinx/Seal: Laying on your stomach, set your forearms on the ground with your elbows underneath your shoulders and hands flat on the ground. Imagine holding an orange underneath your chin, and that should be the distance between your chin and chest. This will put your head, neck, and spine in alignment with slight back bend. Press your hips into the ground and tighten your abs to create an active pose. Stay here for a few deep breathes. To move into seal pose, which is a more intense back bend, move your hands outward to the top corners of your mat and push your upper body off the ground. If this is too intense, allow your shoulders to come up to your ears and relax your body into this pose. Keep your abs tightened and your hips firmly into the ground to protect your lower back. Stay here for a 4 deep breaths then lower slowly to the ground.
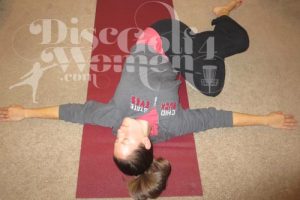
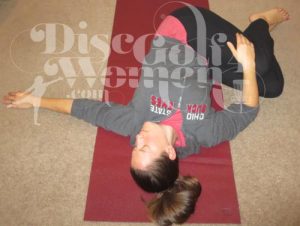
Twist: Start by laying on your back, with knees to chest. A basic twist is just simply keeping your knees together and bringing them to one side, so let’s start with bringing your legs to the right. Place your arms out to the sides in the shape of a T. Focus on keeping your left shoulder to the floor. You may use your right hand to add weight to your knees, and you can turn your head to the left if it doesn’t cause any issues. To make the stretch more intense, try crossing your left leg over your right. Stay here for 5 breaths, and then bring knees to chest to allow your spine to re-adjust. Then repeat this move on the left side.
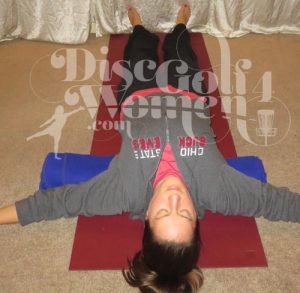
Supported Fish: This can be a very intense stretch because this pose is the opposite of slouching, so be careful coming out of this pose. This pose can be done using a rolled up blanket (coming to about 5” in diameter) or preferably yoga blocks.
Using a blanket, place the roll behind your back just underneath your armpits. Lie down on the blanket roll with your arms out to the side like a T. This is a good pose to truly allow your body to relax into, so hold this pose for at least 5 minutes.
Using yoga blocks, place one block on the lowest position between your shoulder blades, roughly centered on your bra line, and the other block will be behind your head to rest on. Lie down on the blocks, and let your body completely relax into this. This isn’t a necessarily a comfortable position, but it shouldn’t hurt. If it does, move the blocks around to find a good position to support your back. This is a good pose to truly allow your body to relax into, so hold this pose for at least 5 minutes. Once you feel your chest and shoulders release and open, you can remove the block and rest your head on the ground to open up the throat chakra. To get out of the pose, slowly roll to your right side and bring your knees up to relax and remove the prop behind you.
Knees to Chest: This is a great pose coming out of the Supported Fish, or anytime you need a little stretch for your lower back. Start by laying on your back, and the pose is exactly like it says, bringing your knees to your chest while hugging them in or grabbing them separately wherever comfortable. Knees can be together or spread wide. Hug your knees tight for a good lower back stretch, or even rock from side to side or up and down your spine using the weight of your legs to gain momentum.

Hope these moves help to increase the flexibility in your spine and give your back some much needed relief. Try these moves at night to release the stresses of the day and in the morning to get your back ready for the course!
Namaste and Go Buckeyes!
